Saturday, February 2, 2013

Macrome Owl Tutorial part2/2

Continue part2:

5) Second row: 
   5.1) Pin first and last of 90 cm. folded yarn and then separate half 9 lines : 9 lines

    5.2) Second row base on first line and last line pin as picture below and then make knot with first line and last line.
   5.3) Knot right side and then left side. Right side knot 8 lines with last line. Knot as picture below each line twice.
each line make as picture twice


each line make as picture twice


   5.4) End second row with knot as picture below.


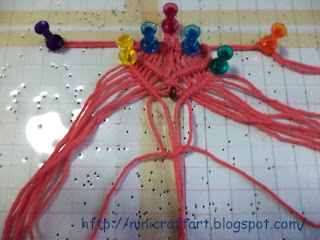
6) Between second row and third row insert bead in as nose as picture below.


7) Third row, as same as method of second row.


8) Fourth row use base lines from center to left and right and knot begin from center and then insert bead for eyes as picture below.

each line make as picture twice

insert bead for eye in line 6 of 8


each line make as picture twice


9) Continue fifth row to seventh row as same as method of fourth row except insert bead.


10) End project knot as same as end second row and you can insert stick as you want.


TERMS: This is for Free Tutorial Not for Commercial do not sell/ or translate into another language for sell. If you want to translate this tutorial into another language for free tutorial please offer a link to my blog would also be greatly appreciated.

Friday, February 1, 2013

Macrome Owl Tutorial part1/2


I use DIY macrame board for this project.

You can make DIY board from Carton or Card board do the same as this link below:
http://ninicraftart.blogspot.com/2013/01/diy-macrame-board.html


Materials:
1) Macrame board
2) Yarn (I use 4 ply cotton but you can use up to you) cut yarn 60 cm. 9 pieces and 30 cm. 1 piece.
3) Bead for eyes and nose
4) Pin
5) Tapestry needle

How to:
1) Folded 30 cm.yarn  in  half  and pin half to board.


2) Knot another side of 30 cm. yarn and pin to board.


3) Folded in half of 90 cm. yarn and make hoop in center as picture below.


4) Floded in half  with 8 remains  of 90 cm. yarn and then knot in first row as picture below.


TERMS: This is for Free Tutorial Not for Commercial do not sell/ or translate into another language for sell. If you want to translate this tutorial into another language for free tutorial please offer a link to my blog would also be greatly appreciated.